
[MODEL] 🎨 How to create your AI character step by step – mini guide.
Alright, today we're doing something that sounds like fun but gives a turbo professional effect.
You will have your own AI character – just like in photos, reels, graphics… and animations. Everywhere.
Perfect for content that builds a brand and sticks in memory.
Here’s a quick recipe 👇
🧩 Step 1: First the prompt – that is, what the AI needs to know
You need to use an advanced framework that will create a GOOD command to generate a character. So ChatGPT - use my GPT to generate graphic prompts:
https://chatgpt.com/share/68b20a3a-fbd8-8003-8d9c-85ee2c776590
You can just write anything here. For example, a blonde woman in her thirties barefoot on the beach. :)
And that’s it. Or describe your character in more detail:
– age, appearance, clothing style, hairstyle, emotion, background, lighting, etc.
– also write what you DON’T want (e.g., extra fingers, tattoos, text on clothes).
Chat will organize it and give you a ready prompt that will give you a great effect in the image generator.
📸 Step 2: Generate the character. Where? I’ve recently been passionately using Higgsfield. Not only is it great, but literally every week they add some mega feature.
Just please don’t complain that… it’s paid…
17USD/month. And you can’t modify it. A GENIUS TOOL.
What’s cool is that new models and novelties are free for a week. That is, as part of the subscription, but they don’t deduct credits.
Right now (29.08.2025) the Google Banana model (REVELATION!) and the highest model Kling 2.1 Master are free. Although only for 5 seconds, you can make an absolutely AMAZING video without credits. Today I probably made about a hundred - I’m making avatars in advance for future reels.
You paste the prompt from Chat into Higgsfield → you get several versions of your character.
You choose the one that best reflects your vibe.
🧼 Step 3: Realism in Enhancor
https://www.enhancor.ai/
And again you’ll say it’s paid. Well, yes. 9USD. Pay for a month, sort out the photos, cancel. The tool changes the skin texture. Why? For this:
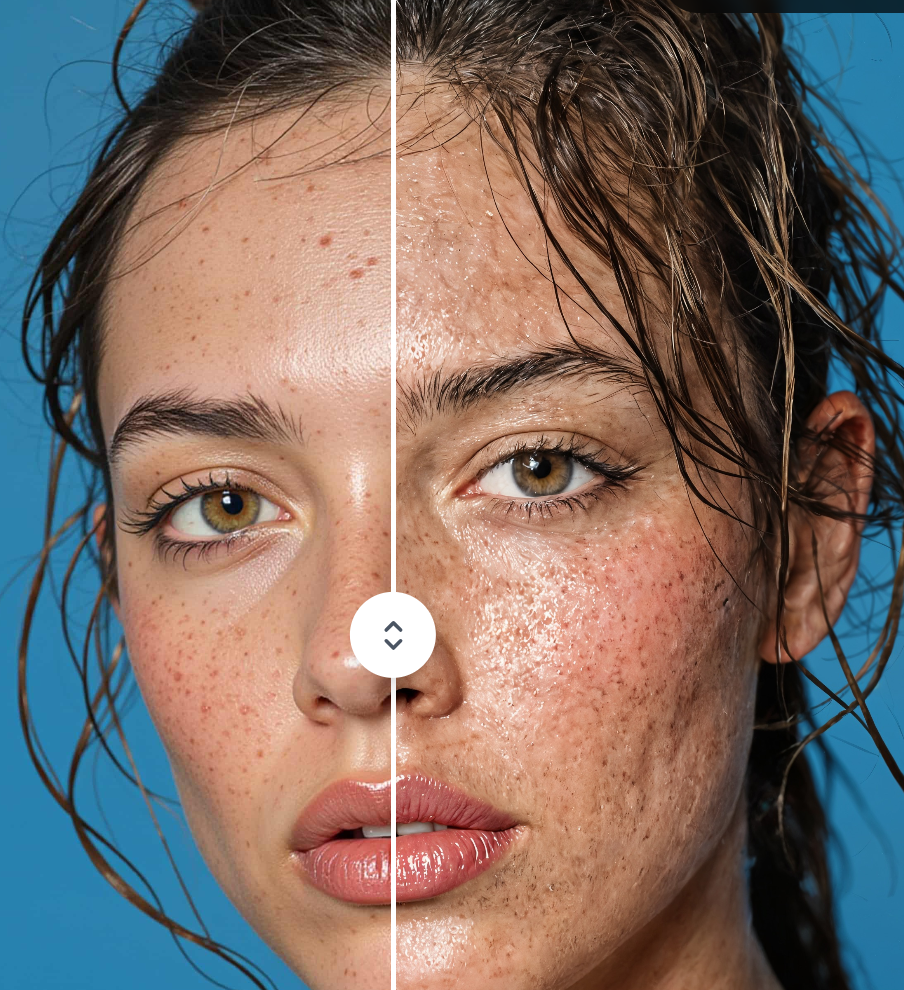
The photo is already there, but now: details.
Upload it to Enhancor to refine the skin textures, hair.
Effect: like from a studio session.
😲 Step 4: Emotions and expressions in the Banana model
You go back to Higgsfield, but this time with a new option – the Banana model.
The same character, but… with different emotions, poses, moods.
The consistency remains, but the diversity increases.
You simply modify your photo multiple times creating a dataset of images.
You improve each photo in Enhancor to make it as realistic as possible.
Remember - shit in, shit out.
Supposedly there’s also a TOPAZ model in Higgs (by the way, absolute PREMIUM) - but somehow Enhancor works better for me.
🧠 Step 5: Train the model in Higgsfield (or another tool, there are many, but Higgs has a lot of cool stuff).
Make a set: 20 character images (or more, the more the better) and upload to Higgsfield / Character.
This allows you to train your own model – that is, to have a character that looks and reacts like you. Every time.

Then you just paste the command (you make it in Chat in the GPT I linked), refer to the trained model - and additionally you also have ready presets. A LOT OF PRESETS.
And you also have of course video.
🎁 And why all this?
Once you create a dataset of images and train your model (or some AI Influ) you can in a couple of seconds create professional AI photo sessions, ready for content, animations, branding materials.
Perfect if:
– you want a consistent image,
– you don’t have time/money for sessions (another industry that’s about to collapse),
– you like to play creatively with AI.

And now pay attention - soon I will launch a new program where I will show step by step how to manage all this. Lessons, ready commands, templates, and my constant support at every stage.
I will keep you posted.
Best regards in the last days of summer,
Michał
Alright, today we're doing something that sounds like fun but gives a turbo professional effect.
You will have your own AI character – just like in photos, reels, graphics… and animations. Everywhere.
Perfect for content that builds a brand and sticks in memory.
Here’s a quick recipe 👇
🧩 Step 1: First the prompt – that is, what the AI needs to know
You need to use an advanced framework that will create a GOOD command to generate a character. So ChatGPT - use my GPT to generate graphic prompts:
https://chatgpt.com/share/68b20a3a-fbd8-8003-8d9c-85ee2c776590
You can just write anything here. For example, a blonde woman in her thirties barefoot on the beach. :)
And that’s it. Or describe your character in more detail:
– age, appearance, clothing style, hairstyle, emotion, background, lighting, etc.
– also write what you DON’T want (e.g., extra fingers, tattoos, text on clothes).
Chat will organize it and give you a ready prompt that will give you a great effect in the image generator.
📸 Step 2: Generate the character. Where? I’ve recently been passionately using Higgsfield. Not only is it great, but literally every week they add some mega feature.
Just please don’t complain that… it’s paid…
17USD/month. And you can’t modify it. A GENIUS TOOL.
What’s cool is that new models and novelties are free for a week. That is, as part of the subscription, but they don’t deduct credits.
Right now (29.08.2025) the Google Banana model (REVELATION!) and the highest model Kling 2.1 Master are free. Although only for 5 seconds, you can make an absolutely AMAZING video without credits. Today I probably made about a hundred - I’m making avatars in advance for future reels.
You paste the prompt from Chat into Higgsfield → you get several versions of your character.
You choose the one that best reflects your vibe.
🧼 Step 3: Realism in Enhancor
https://www.enhancor.ai/
And again you’ll say it’s paid. Well, yes. 9USD. Pay for a month, sort out the photos, cancel. The tool changes the skin texture. Why? For this:
The photo is already there, but now: details.
Upload it to Enhancor to refine the skin textures, hair.
Effect: like from a studio session.
😲 Step 4: Emotions and expressions in the Banana model
You go back to Higgsfield, but this time with a new option – the Banana model.
The same character, but… with different emotions, poses, moods.
The consistency remains, but the diversity increases.
You simply modify your photo multiple times creating a dataset of images.
You improve each photo in Enhancor to make it as realistic as possible.
Remember - shit in, shit out.
Supposedly there’s also a TOPAZ model in Higgs (by the way, absolute PREMIUM) - but somehow Enhancor works better for me.
🧠 Step 5: Train the model in Higgsfield (or another tool, there are many, but Higgs has a lot of cool stuff).
Make a set: 20 character images (or more, the more the better) and upload to Higgsfield / Character.
This allows you to train your own model – that is, to have a character that looks and reacts like you. Every time.
Then you just paste the command (you make it in Chat in the GPT I linked), refer to the trained model - and additionally you also have ready presets. A LOT OF PRESETS.
And you also have of course video.
🎁 And why all this?
Once you create a dataset of images and train your model (or some AI Influ) you can in a couple of seconds create professional AI photo sessions, ready for content, animations, branding materials.
Perfect if:
– you want a consistent image,
– you don’t have time/money for sessions (another industry that’s about to collapse),
– you like to play creatively with AI.
And now pay attention - soon I will launch a new program where I will show step by step how to manage all this. Lessons, ready commands, templates, and my constant support at every stage.
I will keep you posted.
Best regards in the last days of summer,
Michał
5 users upvote it!
0 answers